Eclipse에서 Autoconf 사용시, Autotools 가 실행될 디렉토리를 설정하는 부분이 있다.
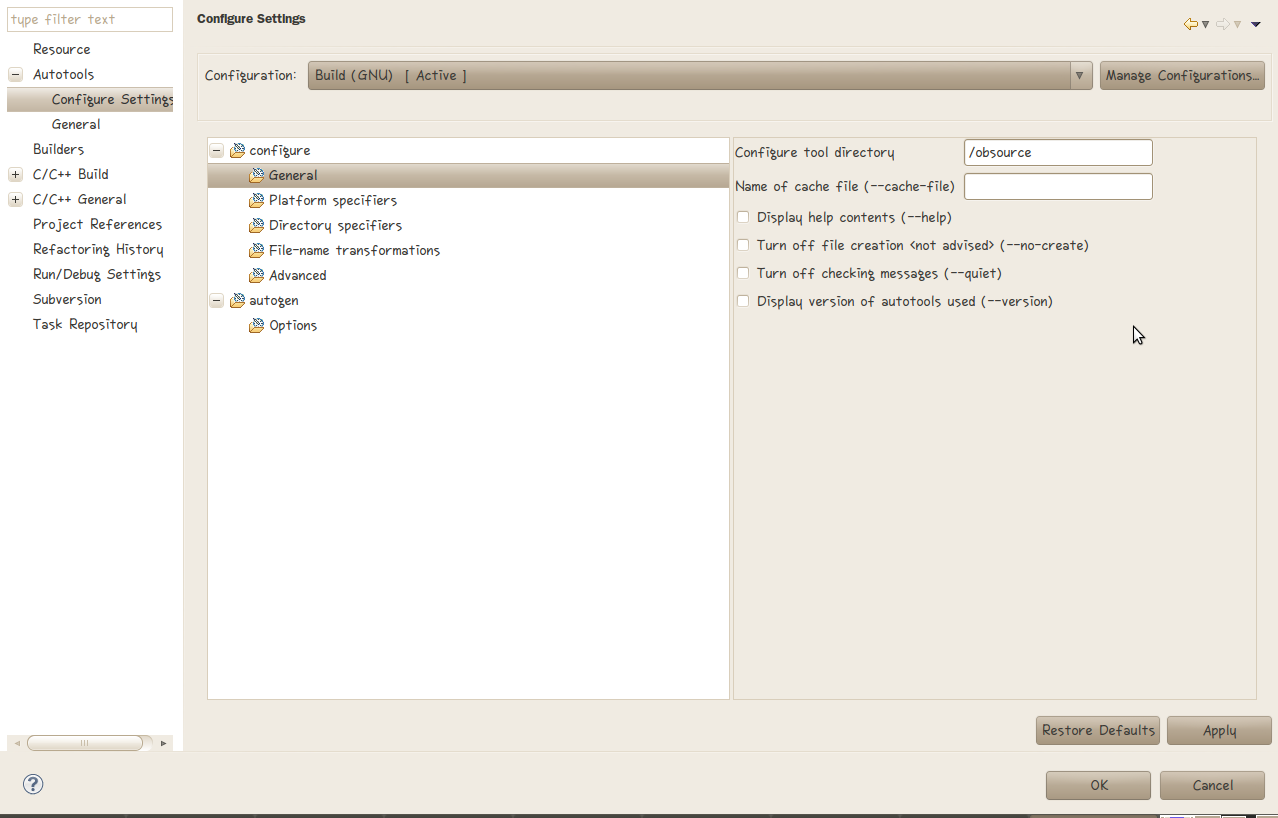
위의 장면에서
Configure tool directory
라고 적혀있는 섹션이 바로 그 부분인데, 여기에 아무 경로나 입력하면 안된다.
Resource 탭에 나와있는 Location 부분을 루트 디렉토리로 하는 절대경로를 지정해야 한다…
이것을 몰라 몇시간을 헤메었는지…
Eclipse에서 Autoconf 사용시, Autotools 가 실행될 디렉토리를 설정하는 부분이 있다.
위의 장면에서
Configure tool directory
라고 적혀있는 섹션이 바로 그 부분인데, 여기에 아무 경로나 입력하면 안된다.
Resource 탭에 나와있는 Location 부분을 루트 디렉토리로 하는 절대경로를 지정해야 한다…
이것을 몰라 몇시간을 헤메었는지…
코딩을 하면서 느낀 점에 대하여 쓴 글타래..
많은 분들이 댓글을 달아주셨다.
한번씩 내가 잘하고 있는지/아닌지 를 파악하는데 중요한 지침서가 될 것 같다.
생각이 나면 한번씩 들려보자.
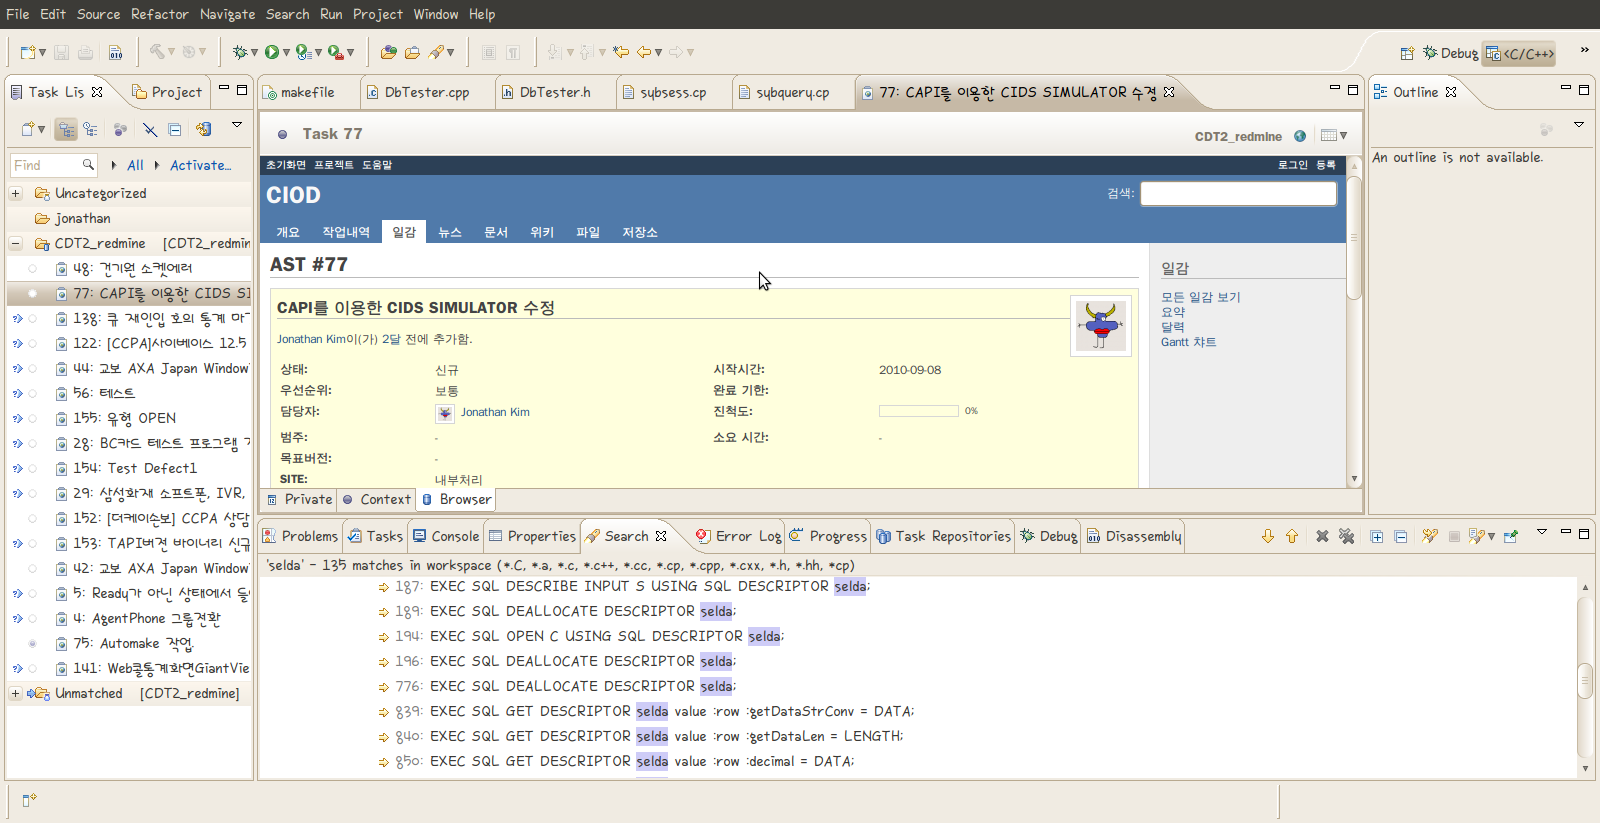
Eclipse 에서 제공하는 여러가지 plug-in 들을 사용하면 레드마인과의 일감 연동을 할 수 있다.
이를 이용하면 eclipse 에서도 redmine 으로 일감 보고/가져오기 등의 기능을 수행할 수 있어 매우 편리하다.
먼저 redmine 과 eclipse 가 연동된 필자의 작업환경을 보자.
먼저 가장 기본이 되는 내용은 Redmine Wiki 의 내용이다. 지금 여기에 적는 내용 역시 redmine wiki 의 내용을 바탕으로 진행한 내용을 옮겨 적은것에 불과하다. 하다가 잘 모르는 내용이 있다면 wiki를 따라가자.
eclipse 에서 redmine 과 연동하기 위해서는 Mylyn plug-in 이 필요하다.
help -> Install New Software 에서 다음의 링크를 추가하도록 하자.
http://download.eclipse.org/tools/mylyn/update/incubator
그러면 여러가지 Mylyn plug-in 들이 나오는데, 이중
Mylyn connector: Web Templates(Advenced) 항목을 설치하도록 하자.
하지만 필자의 경우 의존성 문제가 발생하였다. Mylyn Task List plug-in 이 필요하다는 것이었는데, 다음의 저장소 경로를 추가하여 Mylyn Task List plug-in 을 설치하여 문제를 해결할 수 있었다.
http://download.eclipse.org/tools/mylyn/update/e3.4/
Mylyn Task List 와 Mylyn connector 를 설치하고 다음을 진행하자.
설치가 완료되었다면 일감 설정을 해야한다. 즉, 어느 redmine 서버에서 어느 사용자의 일감을 가져올 것이지 설정하는 것이다.
Eclipse 에서 다음의 View를 추가하도록 하자.
Window -> Show view -> Other -> Task -> Task Repositories
그러면 화면의 아래쪽에 TASK 저장소 window가 나타나게 되는데, 여기에서
마우스 우클릭 -> Add Repository..
를 선택하도록 하자.
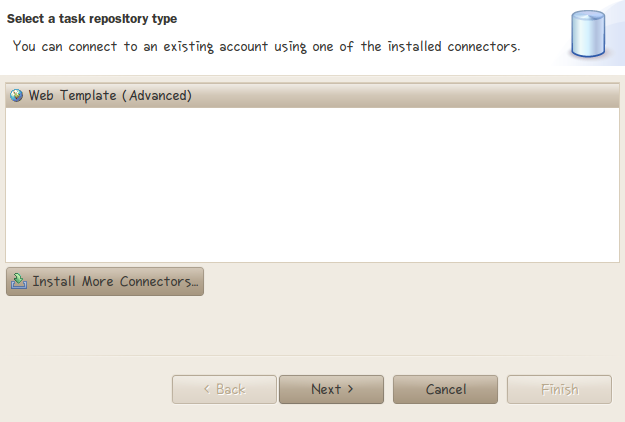
위와 같은 화면이 나오게 되는데, Web Template(Advanced)를 선택하고 Next를 클릭하자.
아래의 그림과 같이 내용을 채워넣자. 자세한 내용을 그림 아래를 참고하도록 하자.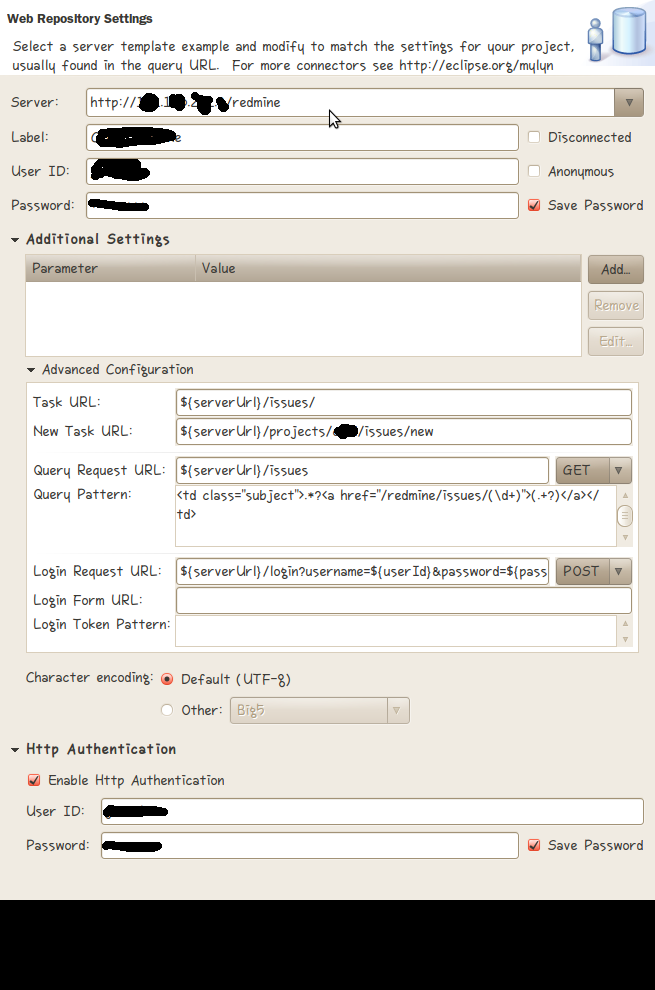
Server: http://www.redmine.org -- Replace it with the URL of your Redmine instance위 박스 안의 내용은 Redmine wiki에서 발췌한 부분이다. 자세히 보면 Query patern 부분과 Server 부분에서 약간의 차이가 있는 것을 확인할 수 있다.
Task URL: ${serverUrl}/issues/
New task URL: ${serverUrl}/projects/foo/issues/new -- Replace foo with the identifier of the project used for new tasks
Query request URL: ${serverUrl}/issues
Query pattern: <td class="subject">.*?<a href="/issues/(d+)">(.+?)</a></td>
Login request URL: ${serverUrl}/login?username=${userId}&password=${password}&authenticity_token=${loginToken} [POST]
Login Form URL: ${serverUrl}/login
Login Token Pattern: <input name="authenticity_token" type="hidden" value="(.+?)" />
이는 필자의 redmine 은 Bitnami 를 이용하여 설치하였기 때문에 redmine의 URL 주소가 약간 틀려져서 그런 것인데, 만약 Bitnami를 설치하지 않았다면
redmine wiki의 내용을 따라가고, Bitnami를 이용하여 설치하였다면 필자의 설정을 참고하여 진행하면 될 것이다.
여기까지 진행이 완료 되었다면 이제 Task List에 Ticket을 추가하는 것만 남았다.
먼저 아래의 Window 를 추가하도록 하자.
Window -> Show view -> other -> Tasks -> Task List
생성된 Task List window 에서
마우스 우클릭 -> New -> Query
를 진행하여 새로운 Ticket을 추가하자.
Select Repository 에서 조금전 생성한 저장소의 label 을 확인할 수 있을 것이다.
Next 를 진행하여 Ticket을 추가하자.
대부분의 설정을 Repository에서 가져오기 때문에 따로 수정할 부분이 없을 것이다.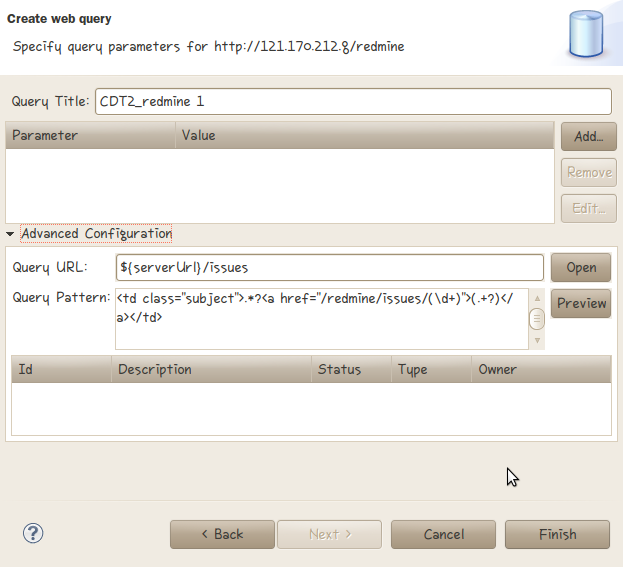
생성된 Ticket을 클릭하면 나에게 주어진 일감들을 확인할 수 있고, 이제 Eclispe에서도 일감의 생성/수정/삭제가 가능해 질 것이다.
참조 사이트
http://jabsiri.tistory.com/35
http://www.redmine.org/wiki/redmine/HowTo_Mylyn
http://blog.namgoos.com/93
리눅스를 사용하는 나에게는 윈도우에서 발생하는 모든 일들이 난감하게 다가온다.
윈도우가 낯설어서가 아닌, 특이하게도 내가 겪는 일들은 보통은 발생하지 않는 에러들이 대부분이기 때문이다.
아마도 윈도우를 VMware 혹은 Virtual Box로 구동해서 그런듯 싶다…
이번에도 한참을 헤매이다 겨우 해결방법을 찾아 이렇게 블로그에 포스팅을 한다.
Visual Studio 6.0 설치 시 ‘ACMEsetup을 찾을 수 없습니다’ 메시지가 나올 경우…
출처 : http://keep2smile.tistory.com/187
————————————————————————————————————————————
이 방법은 Microsoft 홈페이지에 나와있는 글인것 같습니다.
①먼저 widows xp 씨디를 씨디롬 드라이브에 넣습니다.
②시작버튼 -> 실행 -> cmd 를 입력후 엔터 또는 확인을 누릅니다.
(tip. 실행창은 키보드의 윈도으즈키(윈도우즈 마크 찍힌키)+R 을 누르면 됩니다.)
③친숙한 dos 창이 뜨는데요. xp에서는 명령 프롬프트라고 합니다. 이제부터가 중요..
먼저 xp 씨디가 들어간 드라이브 명을 알아둡니다.
(일단 제 경우로 설명드리겠습니다. (제 드라이브명은 D))
도스(일단 친숙하게)창에
cd 를 입력후 엔터 하셔서
C:> 로 오셔야 합니다. 그후
expand D:i386config.nt_ c:windowssystem32config.nt (엔터)
expand D:i386autoexec.nt_ c:windowssystem32 autoexec.nt (엔터)
expand D:i386command.co_ c:windowssystem32command.com (엔터)
(D 드라이브의 i386 폴더에서 config.nt , autoexec.nt , command.co 파일을
C드라이브의 windows의 system32 폴더에 config.nt , autoexec.nt , command.com
라는이름으로 압축풀어라. 라는 명령 같습니다.)
[제 컴퓨터의 경우 xp씨디가 들어간 드라이브명이 D 이니까
expand 뒤에 D 라고적은것입니다. xp씨디가 들어간 드라이브명에 따라
D를 다른 문자로 바꿔야 합니다.]
하시면 각 명령마다 영어로 글이 뜰것입니다.
이제 exit 를 입력하시고 엔터
한번. 에러가 나던 프로그렘을 실행시켜 보십시오.
그래도 에러가 난다구요?
그럼 더 강력한 방법이 아래 있습니다.
아래 소프트웨어를 설치할 때, ‘ACME setup 을 찾을 수
없습니다.’라는 메세지가 뜰 경우 대처법입니다. 제가 헤메다가 이틀만에 찾아낸 해결책이지요. 다른 분들이 저와 같은 경우로
골머리를 썩힐 실 경우를 위해서 등록한 글입니다.
Microsoft Visual Studio 6.0
Microsoft Visual Basic Learning Edition for Windows 6.0
Microsoft Visual Basic Professional Edition for Windows 6.0
Microsoft Visual Basic Enterprise Edition for Windows 6.0
Microsoft Visual C++, 32-bit Enterprise Edition 6.0
Microsoft Visual C++, 32-bit Professional Edition 6.0
Microsoft Visual C++, 32-bit Learning Edition 6.0
Microsoft Visual InterDev 6.0
Microsoft Visual FoxPro for Windows 6.0
Microsoft Visual J++ 6.0
Microsoft Visual SourceSafe for Windows 6.0
해결법 :
도스 프롬프트에서 다음 방법으로 명령어를 친다.
E:disk1SETUPACMSETUP.EXE /T A.STF /S E: /n “” /o “” /k “YYYYYYYYYY” /b 1
여기에서 E 는 설치프로그램이 들어있는 드라이브명이고, A는
설치프로그램이 들어있는 드라이브 안에 있는 SETUP 폴더를 열었을 때, 보이는 STF 확장자 파일입니다. 예를 들면,
Visual Studio 6.0 Enterprise 경우에는 VS98ENT.stf 파일입니다. YYYYYYYYYY는 설치프로그램의
시디키입니다.
이 명령어를 치면 해당 프로그램의 설치프로그램이 자동적으로 뜹니다.
그럼 열심히 프로그래밍하시고요.
저는 이만…
아참, 퍼온 원문을 원하시는 분들을 위해서 원문도 같이 올립니다.
원문에는 ‘CAUSE’ 부분에 원인까지 상세하게 나와 있네요.
PRB: “Invalid Command” or “Installation Wizard” Errors During Setup After the CD Key Prompt
적용 대상
This article was previously published under Q250343
SYMPTOMS
After you start the installation of
Visual Studio 6 (or a standalone Visual Studio product) or Visual Studio
6 Service Pack 5 on Microsoft Windows NT or Microsoft Windows 2000, you
may be prompted to enter the CD key, and then you receive one of the
following error messages:
Setup has encountered a problem and needs to close
Installation wizard couldn’t find Acme setup
Installation wizard cannot find Acme setup
Setup error 530 invalid command line
Setup Error 530 invalid command option in settings administratorslocalsettingstempvs60wiz.exe
Setup error 725 invalid command line
Application Error in VS60wiz.exe
Setup initialization error; there is insufficient memory to run setup
Setup initialization error; there is insufficient disk space to run setup
CAUSE
Setup does not succeed at the Windows NT
Virtual DOS Machine (NTVDM) level as installation is handed off to
Acmsetup. This is caused by a corrupt 16-bit subsystem.
RESOLUTION
On Windows 2000 platforms, boot into Safe
Mode by pressing F8 when prompted at the startup of the system and
selecting Safe Mode. Then attempt installation again.
If the installation does not succeed
and returns one of the errors listed in the “Symptoms” section of this
article, continue with the following steps:
Clear the Temp folder by removing any previous incomplete installations.
The default location for the Temp folder
on Windows 2000 is C:Documents and SettingsProfileLocal SettingsTemp
C:WinntTemp or, if upgraded from Windows 98, C:WindowsTemp.
The default location for the Temp folder on Windows NT 4 is C:Temp C:WinntTemp.
NOTE: To discover the location of your Temp folder: on the Start menu, click Run, type %temp%, and then click OK.
Try to manually start Acmsetup by typing the following command line:
E:SETUPACMSETUP.EXE /T *.STF /S E: /n “” /o “” /k “YYYYYYYYYY” /b1
where E is the CD-ROM or DVD-ROM
drive letter, and YYYYYYYYYY is the CD key for the product (the /k
options and its argument should be omitted for Service Pack
installations).
NOTE:The specific *.stf file that is
required for the manual command line will vary depending on the specific
product you are installing. Search the Setup folder on the CD-ROM of
the product you are installing for the *.stf to use. For example, for
Visual Basic 6.0 Professional, use VB98Pro.stf.
If you still cannot install the product
by passing the command line manually, continue with the following to
repair the NTVDM process.
Nullify any nonstandard settings in
the Config.nt and Autoexec.nt files in the system rootSystem32 folder.
To do so, use an REM statement to remark out each entry except the
following default entries:
Config.nt
dos=high, umb
device=%SystemRoot%system32himem.sys
files=20
Autoexec.nt
lh %SystemRoot%system32mscdexnt.exe
lh %SystemRoot%system32redir
lh %SystemRoot%system32dosx
lh %SystemRoot%system32nw16 (only if CSNW is installed)*
lh %SystemRoot%system32vwipxspx (only if CSNW is installed)*
* CSNW is Client Services for NetWare
NOTE: Another way to accomplish this is
to expand Autoexec.nt_ and Config.nt_ from the Windows NT or Windows
2000 CD-ROM to the SystemRootSystem32 folder:
To expand a single compressed file, use
the Expand.exe program. This program is located on the Windows CD-ROM in
the I386 folder.
To expand the required files:
Insert the Windows CD-ROM into the CD-ROM or DVD-ROM drive.
At the command prompt, type the following, and then press ENTER:
C:WINDOWSSystem32Autoexec.nt
At the command prompt, type the following, and then press ENTER:
EXPAND X:i386Config.NT_ C:WINDOWSSystem32Config.nt
Restart the computer and try to install the product again.
MORE INFORMATION
Setup.exe passes the following to Acmsetup.exe:
X:disk1SETUPACMSETUP.EXE /T VS98Ent.STF /S E: /n “” /o “” /k “YYYYYYYYYY” /b 1
where:
X is your path to Acmsetup.exe
E is the CD-ROM or DVD-ROM drive letter
YYYYYYYYYY is the CD key
You can verify the command line switches
by running Setup on a computer that you know is operating correctly,
thereby creating a setup log.
Your specific *.stf file will vary
depending on the specific product you are installing. Search the Setup
folder of the product you are installing for the *.stf to use. For
example, for Visual Basic 6.0 Professional, it is VB98Pro.stf
Generating a Log File
You can tell the Acme part of Setup to generate a log file. To do this, start Setup with the following command:
X:setup /gc pathfile name
where X is the location of the CD-ROM
or DVD-ROM drive, and pathfile name is the path and file name for the
log file. The path and file name must be in 8.3 short name format and
must not be in quotation marks.
REFERENCES
For additional information, click the article numbers below to view the articles in the Microsoft Knowledge Base:
196453 Troubleshooting NTVDM and WOW Startup Errors
220155 Troubleshooting NTVDM and WOW Startup Errors
165214 Troubleshooting MS-DOS-Based Programs in Windows
222975 Cannot Install Program Using Its Setup Utility
260513 PRB: An Error Occurs When You Install Visual Studio Products
192392 HOWTO: Troubleshoot Visual Studio 6.0 Setup
192731 BUG: Hang or Application Error in Setup
The information in this article applies to:
Microsoft Visual Studio 6.0
Microsoft Visual Basic Learning Edition for Windows 6.0
Microsoft Visual Basic Professional Edition for Windows 6.0
Microsoft Visual Basic Enterprise Edition for Windows 6.0
Microsoft Visual C++, 32-bit Enterprise Edition 6.0
Microsoft Visual C++, 32-bit Professional Edition 6.0
Microsoft Visual C++, 32-bit Learning Edition 6.0
Microsoft Visual InterDev 6.0
Microsoft Visual FoxPro for Windows 6.0
Microsoft Visual J++ 6.0
Microsoft Visual SourceSafe for Windows 6.0
1. 공식 다운로드 페이지에서 ACE-5.5.tar.gz파일을 다운로드 받습니다.
2. 환경 변수를 설정합니다.(~/.bash_profile)
– ACE_ROOT=/home/k2/Apps/ACE_wrappers;export ACE_ROOT
– LD_LIBRARY_PATH=$ACE_ROOT/ace:$ACE_ROOT/lib:$LD_LIBRARY_PATH;
export LD_LIBRARY_PATH
3. $ACE_ROOT/ace에서 심볼릭 링크 추가합니다.
– ln -s config-linux.h config.h
4. $ACE_ROOT/include/makeinclude 에서 심볼릭 링크 추가합니다.
– ln -s platform_linux.GNU platform_macros.GNU
5. $ACE_ROOT/ace에서 make
6. 컴파일 제대로 되었는지 확인합니다.
– $ACE_ROOT/examples/Threads에서 make
– ./task_one 실행하면은 아래 결과처럼 나오면 성공이에요
(3076410288) in iteration 1
(3076410288) in iteration 2
(3076410288) in iteration 3
(3076410288) in iteration 4
(3076410288) in iteration 5
(3076412064) done
7. 설치된 라이브러리 디렉토리는 $ACE_ROOT/lib입니다.
8. 그 다음 ACE 라이브러리를 확인하여 서버 프로그램 개발을 하면 됩니다.
출처 : http://sexymiru.egloos.com/1967295
——————————————————————————————
실행환경 : ubuntu-10.04 Desktop 버전에서 에러 발생.
컴파일 중 재정의 문제가 발생. 설치가 진행되지 않는다. configure 를 이용한 설치에도 제대로 진행이 되지 않았다.
구글과 ACE 메일링 리스트를 살펴서 여러가지 해결법을 찾아보았지만 보이지 않았다… 어떻게 해야되는 것일까…
Ubuntu-09.04(혹은 09.10) Server 버전에서는 아무 문제 없이 컴파일 되는 것을 확인 했다. 특별히 배포판을 가리지는 않는 것 같다. 아마도 문제점은 커널 버전 혹은 g++ 의 버전 정도가 될 것 같다.
재정의 컴파일 오류가 났으니 특정 라이브러리가 설치되지 않아서 생기는 문제는 아닌 것 같다.
사실, ACE-5.8.* 버전은 설치가 쉽게 되었다. 하지만 ACE-5.8.* 대의 버전을 설치할 경우, ACE-5.5.* 버전에서 지원하는 메소드 및 함수가 지원되지 않은 것들이 있다.
즉, 내가 필요로 하는 메소드와 함수들은 ACE-5.8.* 버전에서는 지원하지 않는 것이다.
흠.. 조금 더 낮은 버전에서 찾아볼까..
———————————————————————————-
설치의 실마리를 찾았다.
출처 : http://anyons.net/tc/entry/ACE-%EC%84%A4%EC%B9%98-%EB%B0%A9%EB%B2%95